This old barn, actually a corn crib with attached shed rows, sits down below the house near the edge of the garden plot. It was not on the property we bought but clearly belonged to the original homestead. The discrepancy between the traditional property lines established a long time ago (from this tree to that rock, to the edge of the creek, etc.) and the property lines established by more modern surveys based on iron pins set by agreement among the property owners in the early 1900's meant that the barn was no longer technically on the property, but nobody bothered to move the existing fences until my piece of property was carved out of a larger whole. My neighbor and I worked out a deal and an additional 1/2 acre of land including this barn was deeded over to me.
You can see the large piles of debris we pulled out from underneath the shedrows. Some went to to the dump, some into the burn pile and the useful timbers were stacked under the shed rows for some unnamed future projects.
We moved a couple of cubic yards of dirt to fill holes and level the floor on the North side so the lawn tractor and tiller could be stored under the roof instead of under the tarps they had been living under for the past year.
The main peak roofed building is a very sturdy slat wall corn crib that is entirely lined with 1/2" hardware cloth making it vermin and critter proof. This has been swept out and will be the chicken coop this spring and summer.
South side view. You can see the shedrows have collapsed on each side the corn crib which will be repaired with rafters, boards and tin roofing salvaged from the old log cabin being dismantled elsewhere on the property.
North side view. The equipment is all under this portion of the shedrow. All the rouge saplings and trees growing up all around the barn will be removed next, before the restoration work starts of the structure.
West side view. Trees need to be removed. You can see the shed row is in good shape on the North (right) end and is collapsed / gone on the South (left) end.
As the work slowly progresses I'll post more about this project. Wish us luck!
Monday, February 9, 2015
Thursday, December 4, 2014
THE GREAT WALL (of jars)
Next to the kitchen there is a laundry room <slash> pantry where we store most of our dry good groceries -- flour, bakery ingredients, canned goods, rice , beans, and so forth. Part way through the gardening season and into the canning season we ran out of room. In the dining area we built this wall of shelves to hold all our current and future stock of home canned produce.
Preserves, Hot Sauce, Chiles, Relish, Dill Pickles, Bread & Butter Pickles, Tomatoes, Tomato Sauce, Spaghetti Sauce, Tomatillo Salsa, Baked Beans, Summer Squash, Sun-Dried Tomatoes, Pumpkin, Green Chile Enchilda Sauce, Dried Sage, Marjoram, Oregano, Ancho Chile Powder, Dried Parsley, Dried Cilantro, Cayenne Pepper Flakes. There is room for about 350 jars. I don't think it will be enough next year. We have frozen garden peas, green beans and Basil/Walnut Pesto too.
The New Lawn (aka Post Septic Tank Apocalypse)
After getting a new septic tank and new septic drain field installed (see earlier post - New Septic System - or How To Spend $600 An Hour) We had to wait for several good soaking rains to settle the ground, then move the soil around from the high spots to the low spots, then wait for more good rainfall and smooth out the ground again. This was no easy task. The area is about the size of a typical suburban lot - about a 1/4 acre. Once we had not waited long enough, but had had enough of looking a red clay dirt we raked the entire area one last time and spread fertilizer and grass seed over the area the day before a rain forecast.
9/26/2014 four days after seeding and a good rain
we have LIFT-OFF!! ..... uh... I mean germination!
10/1/2014 it's starting to look pretty good
10/4/2014 looking like a lawn almost
10/19/14 a thick green lawn!!
Tuesday, December 2, 2014
Halloween Pumpkins
I know, I know..... I haven't posted much on the blog in recent months. Busy, busy, busy. Today is a dreary cold drizzly day - a good day for catching up with blog postings.
This year's pumpkin carving was a minor disaster. Normally the pumpkins I buy for carving keep very well after carving, but this year they didn't. The complicated carving takes a couple of hours or more for each pumpkin so I usually start a few days before Halloween. Normally they still look nice and fresh on Halloween night. I'm sure the very warm day time temperatures for several days before the 31st and the not very cold nights didn't help, but I also think it had something to do with the locally grown pumpkin varieties just not keeping as well as what I'm used to.
So that's my excuse and I'm sticking to it. Here is a photo of the only carved pumpkin worthy of posting. It is, of course, the last pumpkin I carved on Halloween day, so it was fresh and not wilted.
Harvesting the wheat
OK - we didn't grow the wheat, but we did harvest some wheat this year. The adjoining property to the East has been planted in a rotation of tobacco followed by winter wheat and then by soy beans for many years. When my property was carved out of a larger parcel, a small portion of the crop land ended up on my side of the property line. It was planted in tobacco last spring before I purchased the property and last fall it was planted in wheat. This past summer I cleared the strip where the property line was and started digging post holes for a fence.
So this small corner patch of the wheat field is on my side of the property line.
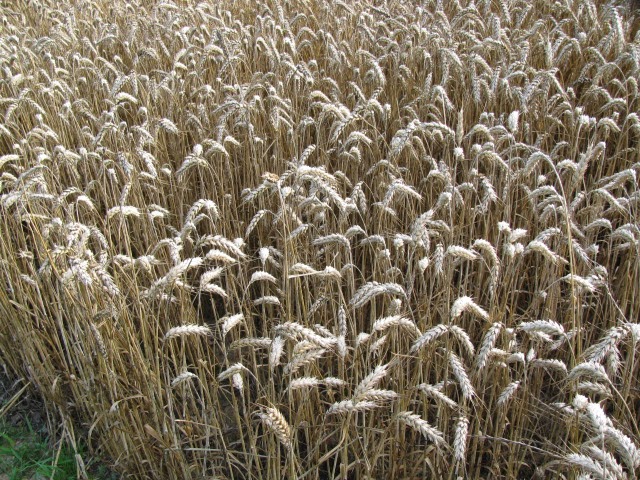
The ripe wheat is ready to harvest -- I think? How do you know?
There are 2 ways to know when to harvest.
You pluck off a head of wheat from a stalk.......
.....and you rub it briskly between your palms......
....and blow away the chaff and then chew on a wheat kernel to see if it is dry enough.
......or......
you just wait until your neighbor shows up with this behemoth combine to harvest the wheat in the main field right on the other side of the fence. That's when you harvest your little patch.
So we hand cut about a 3rd of the wheat and threshed it by beating bundles of the stalks against the inside of a new, clean galvanized trash can. Then we removed all the chaff by pouring the wheat from a pan in front of a box fan. The wheat chaff blew away into the yard and the clean wheat kernels fell onto a tarp spread on the ground. We got about 40 pounds of wheat kernels that way. We expected the total we would get our patch would be about 100 to 120 lbs, but then we discovered why the wheat had been harvested the day it was. Oh, it was dry and ready to harvest, but more importantly it rained heavily the next day knocking all the remaining standing wheat kernels to the ground. Oh well, it was fun while it lasted.
No I didn't buy a $200, or $400 or $1,000 mill to make $20 worth of flour. We used the wheat as part of a cover crop mix with clover to plant in idle parts of the garden.
Tuesday, August 26, 2014
Salt Marsh Moth
Estigmene acrea (Salt Marsh Moth) |
Saturday, August 23, 2014
New Septic System.... or How to spend $600 an hour without even trying!
After consulting with a certified soil scientist (a neighbor who lives less than a mile from our house) we had the contractor here last week to install a new septic tank and new drain field. A one day job costing $5000.00! but hey - we're good for another 75 years - more or less.
First you find the old septic tank and pick a spot on the sewer line between the house and the tank where there is a joint in the cast iron pipe |
Pipe in the trench leading to the new "D-Box" |
New "D-Box" for 4 drain field lines |
Next you dig a 65 foot long 6 1/2 foot deep trench across the slope of the land following the ground contour |
Like this |
Then you dig three more identical trenches parallel to the first turning the entire back yard into a re-enactment of WWI trench warfare |
Last everything is buried and smoothed out. Done! |
Subscribe to:
Posts (Atom)