Wednesday, July 23, 2014

Random Nature

There is something gratifying about coming across some random bit of the natural world on our property.  Bumble Bees buzzing in the squash blossoms,  a Preying Mantis perched on the string weaving in the tomato patch,  Wild roses blooming next to the road.  I always pause to admire.  I am NEVER in such a hurry to miss the opportunity to enjoy the natural world around me.  And it pleases me that the habitat right here in my yard supports a diversity of life.
Early morning dew on a clothes line spider web.  Made last night in the still air, it will be gone when mid morning breezes dry it out and blow it away.  She will make another tonight.
Little green frog on an Acorn squash leave - acting nonchalant while eying the squash bug.
Frog eggs (no relation to the little green frog) in the seep down by the back of the property.

Monday, July 21, 2014

Tomatillo Salsa

Ingredients:
2 lbs fresh tomatillos
1 large white onion (yellow is OK too)
4 large cloves of garlic
4 medium Hatch New Mexico green chiles (gotta be the real thing! - aaah, no they don't - if you use Anaheim chiles from the grocery store you probably will want to add a jalapeno chile for some heat)
1 tsp salt
1/4 tsp fresh ground black pepper
2-3 Tbs fresh squeezed lime juice.
1-2 tsp olive oil
1/4 cup chopped cilantro
water as needed

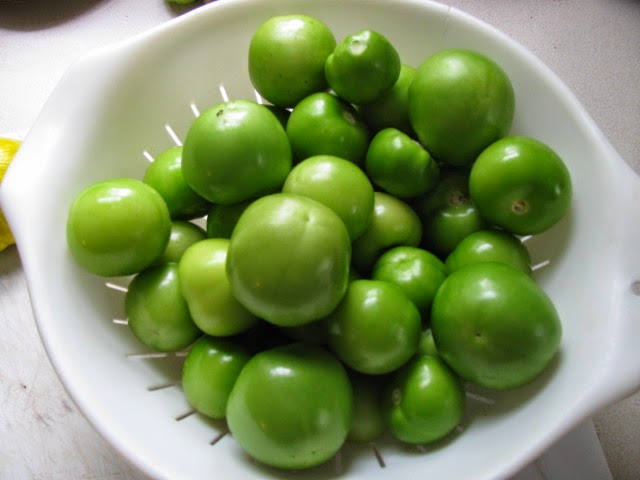
Tomatillos - just picked
 Method:
Remove the husks and wash the tomatillos.  If you have never used tomatillos before - don't be freaked out by their sticky feel - that's normal and OK and goes away when cooked.
Tomatillos - husked, washed and ready.
The other stuff - the onion and the green chiles are from our garden - next year the garlic will be too.
Roast the chiles on the grill outdoors (my method) or under the broiler or right on gas stove top burner until they are charred all over and look like this.
Roasted New Mexico green chiles
Put the roasted chiles in a bowl, cover tightly with plastic wrap and set aside for 20 minutes to steam.
When the chiles are cool, cut off the tops, peel off and discard the charred skins.

In a roasting pan - put the whole tomatillos, rough chopped onion, rough chopped garlic and the rough chopped roasted peeled green chiles (and rough chopped jalapeno, if using).  Add the oil and toss to coat.  Sprinkle on the salt, pepper, and lime juice.
Roast in a preheated 375 degree oven for one hour until the tomatillos are tender and blackened a bit in spots.  Puree the roasted veggies in a blender or food processor, adding water as needed to get the right consistency.  What is the right consistency you ask?  I give up - what is the consistency you like?  That's the right consistency.  Serve warm or at room temperature.  Add the fresh chopped cilantro just before serving.  Lasts a week in the fridge.  Great as tortilla chip dip, of course, but also great as a taco sauce or green enchilada sauce (although I make a different green chile enchilada sauce - smooth Sante Fe style for chicken enchiladas.  I'll post that recipe when all the chiles are ready to harvest.)

I made a larger batch of salsa from the 3 1/2 lbs of tomatillos we harvested yesterday and adjusted the proportions of the other ingredients accordingly.  I canned the sauce in pints jars - so after roasting the veggies I transferred it all to a sauce pan, used an immersion blender to puree it, adding enough water to make a sauce just a little thinner than canned tomato sauce.  I pressure canned it - processing the jars for 20 minutes at 10 psi so I did not have to worry about it being acidic enough for water bath canning.
The finished Tomatillo Salsa

Tuesday, July 15, 2014

Basil Laundry!

We have a huge amount of Basil growing.  I've been making and freezing Pesto and now it's time to preserve some of it by drying.  This is about 10% of the Basil we have growing.  Really - maybe 10%.   Oh - we're having pizza tonight with lots of fresh Basil on it - that will use up about .0001% of the fresh Basil - more or less.  I've gotta make more Pesto!

Garden Update Photos

 ONIONS
foreground left - Red onions, tops falling over, almost ready to pull; foreground center - Chippolini onions almost ready.  Background left - yellow onions; background center - white onions.  On the right are Leeks.
Closer view of yellow onions on the left and white onions on the right.  They are about as big as they are going to get and the tops are starting to fall over.  They will be ready to harvest fairly soon - then dried and stored.  We have a total of around 300+ onions between the 4 varieties we are growing.
Yellow onion straight from the garden.  They don't need to be dried and stored before using.  They can be pulled  and used right away.  This one was turned into sliced grilled onion to top off some bacon cheeseburgers.

SWISS CHARD
Pick larger outside leaves.  The smaller inner leaves will continue to grow and new leaves will sprout.
Large leaves washed and ready to prepare.

Tear off the green leafy part and chop the center stem into bite size pieces
 A good simple preparation for Swiss Chard:
Saute the stems in a combination of butter, olive oil and white wine for 5 minutes.  Add a clove on minced garlic and saute for 30 seconds.  Add the leafy green parts, a little lemon juice, salt & pepper and saute until the greens are wilted.  Remove from the heat.  Add a little Parmesan cheese.  Serve.

 THINGS THAT ARE GROWING!!
Pumpkin and Watermelon vines
Sugar Pie Pumpkin
Acorn squash
Poblano peppers
Fennel

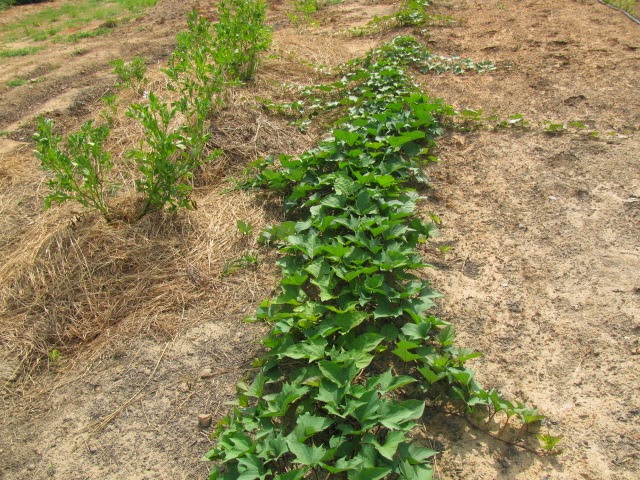
Sweet potato vines
2nd planting of tomatoes - we are going to let these sprawl on the ground
Kentucky wonder pole beans

Sun Dried Tomatoes

I think the secret to good sun dried tomatoes is....... wait for it........ THE TOMATO!  Brilliant huh?
I grow Principe Borghese tomatoes from seeds imported from Italy.  They are the traditional variety grown for making sun dried tomatoes - tart sweet, meaty and just the right size to cut in half and dry nicely.
A few of the 28 Principe Borghese tomato plants growing this season.
Slice the tomatoes in 1/2 lengthwise - stem to blossom end
Two simple frames made from 1x2 furring attached together with small butt hinges and held closed with a clasp

Window screen stapled to the inside of each frame - ready for the 'maters!
Arrange the sliced tomatoes cut side up; close and latch the frames together; place in the bright hot sun for a few days.


 Trying this in the humid Southeast is new to me.  I plan on bringing in the tomatoes every evening so they are not dampened by dew (or rain) during the night and early morning and putting them back out mid morning when everything is dry.

Friday, July 11, 2014

Garden Lettuce

Red Salad Bowl Lettuce, Speckled Bibb Lettuce, and Capitan Lettuce -- Fresh from the Garden!


A picture is worth a thousand words.

Thursday, July 10, 2014

How To Make A Cucumber Trellis

Making your own sturdy, inexpensive trellis for cucumbers, peas, pole beans and so forth is not difficult to do.  With this method, which is quite common and not any sort of innovation on my part, works very well, can be easily made in any height and width to fit your space and your needs.  Notice on this photo of the finished trellis that it is not perfect.  The strings are knotted 'approximately' where they need to be.  The cucumbers don't care and soon enough the vines will completely cover the trellis hiding all those annoying imperfections.  Don't let perfection be the enemy of the good when it comes to this project. 

 1.  Install a post at each end of your row to support your trellis.  I use T-posts about 8 feet apart.  How far apart the posts can be depends on the strength and tightness of the top horizontal support.  I use heavy gauge baling twine, which can be made very tight, stretches very little and therefor does not sag easily.  I could probably go 10-12 feet apart. 

The finished trellis
2. Attach your top string between the end posts at the height you want.  Make sure it's really tight.  The top of my trellis is at 5 feet.  Cut pieces of twine twice the height plus 4 feet - so I cut the twine pieces 14 feet long each.  Fold a string in half, loop it around the top string and bring the cut ends of the twine through the loop.  tighten the looped knot on the top string.  You will have a pair of twine pieces dangling from each each loop knot.  Place twine pairs about 6 inches apart all along the top string with the first and last pairs right next to the end posts.
looped twine attached to top string
All the twine attached to the top string
3.  Think of the dangling twine pieces as numbered.  Working from left to right, the first two dangling strings are no. 1 & 2, the next pair 3 & 4, next 5 & 6 and so forth.  Forget string no. 1 for the moment.  Take no. 2 and no. 3 and tie them in a knot about 6 inches below the top string to make a triangle.  Be sure to knot the strings using a 'square knot'.  "Right over left - Left over right".  That way the knots will not slip.
String no. 1 still dangling and string no. 2 & 3 knotted together
Knot together all the string pairs --  2-3, 4-5, 6-7, 8-9,........etc., forming triangles across the top string ending with the last string dangling next to the far post.
Step 3 completed.  All the pairs knotted and last string dangling at the end post
4.  OK - next row.  Take string no. 1 and wrap it around the back side of the end post and knot it to string no. 2  at a point 12 inches down from the top string for string no. 1 and 6 inches below the knot for string no 2.  After that, knot together the pairs of strings 6 inches below the knots above -- 3-4, 5-6, 7-8, 9-10, .........etc., forming a diamond pattern.  At the far end, wrap the last string round the back of the end post and knot it 12 inches below the top string and 6 inches below the knot above for the next to last string.
2nd row completed. Notice the last string wrapped around the post
5.  Repeat the knotting pattern row after row until you get close to ground level.  Row 3 - knot together strings 2-3, 4-5, 6-7, etc.,  six inches below the knot above, ignoring the first and last strings.  Row 4 - knot together strings 1-2, 3-4, 5-6, etc., six inches below the knots above, being sure to wrap the first and last string around the end post before knotting it 12 inches below the knot above.  For a 5 foot high trellis you will have about 10 rows.
end post showing the first string wrapped around the post at every other row
When you knot enough rows to reach close to the ground you will have a foot or so of dangling twine at the bottom.  It is not necessary to have the trellis reach all the way to the ground.  In fact - it's not good if it does.  It makes weeding, cultivating, mulching and so forth, more difficult if it does.  You can just let the loose ends of twine just dangle or cut them off about an inch below the bottom row of knots, which again, makes working around the young small plants easier, I think.  I run a bottom string of the heavy duty baling twine between the end posts, weaving it in and out the bottom row of diamonds.  This is optional but makes for a neater finish.


Tuesday, July 8, 2014

The Taylor Family Cemetery

Our country home was built in 1859 by M.C. Taylor for his wife Sarah (Sallie) Taylor and their children.  It was the second home built on the Taylor property - the foundation ruins of an earlier home, probably from the early 1830's when Miles and Sallie were starting their family - lies in the woods about a 1/2 mile north of the current house.
The front porch is clearly a later addition and is not original to the house.  I'm not sure what type, if any, of front porch the home may have originally have had.

 The Taylor family property is popularly believed to have been several thousand acres at one time, encompassing land from about a mile or so north of the home, east about a 1/4 mile to the county line, west about 1 1/2 miles and south about 4 miles to the Meherrin River.  Around 5,000 - 6,000 acres.  Early Civil War era maps mark the property.
'Gilmore' map of 1864.  M. Taylor property marked in the bottom right corner just west of the county line.
On the east side of the house is a tranquil oak shaded family cemetery where the Taylor family members are buried as well as the descendents who inherited and lived on the property all the way up to us purchasing the home.  The cemetery is a separate piece of land, officially deeded and registered as a private cemetery.

Posts for gate into the cemetery
I'm installing a fence around the property I own.  The cemetery has frontage on the paved road, so technically there is 'access', but in reality there is no driveway and the graves are 400 plus feet from the road next to the house.  I'm installing a gate in the property fence line so visitors and family can have easy access to the graveyard.

Miles C. Taylor.  Feb 15, 1806 - Nov 28, 1889
Sallie E. Taylor.  Feb 14, 1808 - May 27, 1885
The original owners of the home are buried side by side near where The gate will be installed.

Confederate veterans graves with original bronze medallions from the Confederate Veterans Association c.1890's
Four Taylor sons and a son-in-law, all Confederate veterans, are buried in the family cemetery near their parents whose graves are at the far right in the picture.  In the back row at the far right there is a flag and medallion without a headstone.  This is the grave of Robert Sterling Taylor, Miles & Sallie's youngest son of age to serve in the military during the Civil War and the only one who died as a result of a wound sustained during the war.  Born Jan 31, 1843 he died on Mar 31, 1863 at home.  He was 20 years old.  His headstone is propped up at the base of one of the oak trees and just barely readable if the light is just right.  I am researching ways to restore the headstone properly and will re-install it on his grave when the work is completed.  Three other older sons, Benjamin James Taylor, Richard Henry Taylor, and William Daniel Taylor and son-in-law John William Turner all survived the war.  At least two of them were surrendered by General Lee to Grant at Appomattox.  On-line I have seen copies of their parole slips given to them for safe passage back home as well as some of their muster papers, payroll records and other documentation.  More research will fill in some of the blanks.  Members of the local chapter of the Confederate Veterans Association come once a year in the spring to clean up the cemetery and place new flags on the graves.

descendent owners of the Taylor home are buried in the north end of the graveyard
Interestingly all the sons of Miles and Sallie moved away, had lives and property elsewhere in Virginia, were brought home for burial when they passed, but did not inherit the home place and property.  The home passed to a daughter who married a Turner, whose daughter married a Hardy, whose daughter married a Boettcher.  Turners, Hardys and Boettchers are all buried in the graveyard.  The last and most recent burial was Janet Hardy Boettcher in 2002.  Her grave is just barely visible in the bright sun in the background next to the large shrub in the upper right of the picture.  I think Miles and Sallie would have been her great-great-great grandparents.  I'll figure it all out one day.  By the way - the Confederate Veterans Association is an equal honor group.  They place the Stars-and-Bars flag of the Confederacy on Confederate veterans graves and the Stars-and-Stripes on the graves of Union veterans and veterans of modern US Military units.  Janet Boettcher was a Navy nurse who served in Vietnam so her grave gets a new flag every spring also.